How to Send Automatic Out of Office Replies
- Tammy Voigt
Analytics
Using the Outlook Desktop App:
To Turn on Automatic Replies:
Select File > Automatic Replies.

In the Automatic Replies box, select Send automatic replies.
Optionally, set a date range for your automatic replies. This will turn off automatic replies at the date and time you enter for the end time. Otherwise, you'll need to turn off automatic replies manually.
On the Inside My Organization tab, type the response that you want to send to teammates or colleagues while you are out of the office.
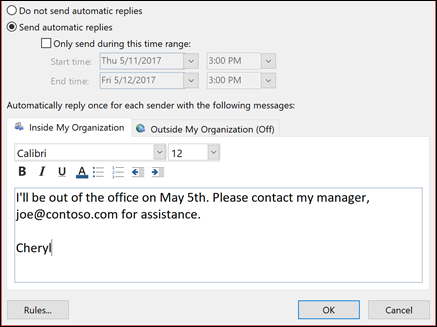
On the Outside My Organization tab, type the response you want to send to senders from outside of SU.
Note: Sending automatic replies to anyone outside my organization will send your automatic reply to every email, including newsletters, advertisements, and potentially, junk email. If you want to send automatic replies to those outside your organization, we recommend choosing My contacts only.
Select OK to save your settings.
Turn Off Automatic Replies:
When Outlook is setup to send automatic replies, you'll see a message under the ribbon with this information.
Select Turn off to disable automatic out-of-office replies. If you want to modify the dates for your automatic reply or the message sent, use the steps above to modify your settings.

Using the Office 365 Outlook WebApp:
To Turn on Automatic Replies:
- Go to https://office.com and select Outlook
At the top of the page, select Settings > Mail > Automatic replies.
Select the Turn on automatic replies toggle.
Select the Send replies only during a time period check box, and then enter a start and end time.
If you don't set a time period, your automatic reply remains on until you turn it off.
Select the check box for any of the following options that you're interested in:
Block my calendar for this period
Automatically decline new invitations for events that occur during this period
Decline and cancel my meetings during this period
In the box at the bottom of the window, type a message to send to people during the time you're away.
If you like, you can use the formatting options at the top of the box to change the font and color of the text or customize your message in other ways.
If you want senders outside your organization to get automatic replies, select the check box for Send replies outside your organization.
When you're done, select Save.

Turn Off Automatic Replies:
If you didn't set a time period for automatic replies (step 4 earlier), you'll need to turn them off manually.
To turn off automatic replies, sign in to Outlook on the web by going to https://office.com
Choose Settings  > Mail > Automatic replies and then select the Automatic replies toggle to the off position.

Related content
Did this solve your issue??